Creating a responsive Flutter application using Material Design using a navigation drawer
The navigation drawer is one of the most common ways to provide a user with access to various destinations with an application. As Flutter can now be used to target other platforms...


The navigation drawer is one of the most common ways to provide a user with access to various destinations with an application. As Flutter can now be used to target other platforms like the web, it is important to consider how your application handles responsive design. Successfully doing so enables your application to make more effective use of the amount of real estate available on larger devices. In this post, we'll see how can achieve this goal.
For responsive applications that use a navigation drawer (sometimes referred to as an app with master-detail layout), the following scenarios would likely need to be handled:
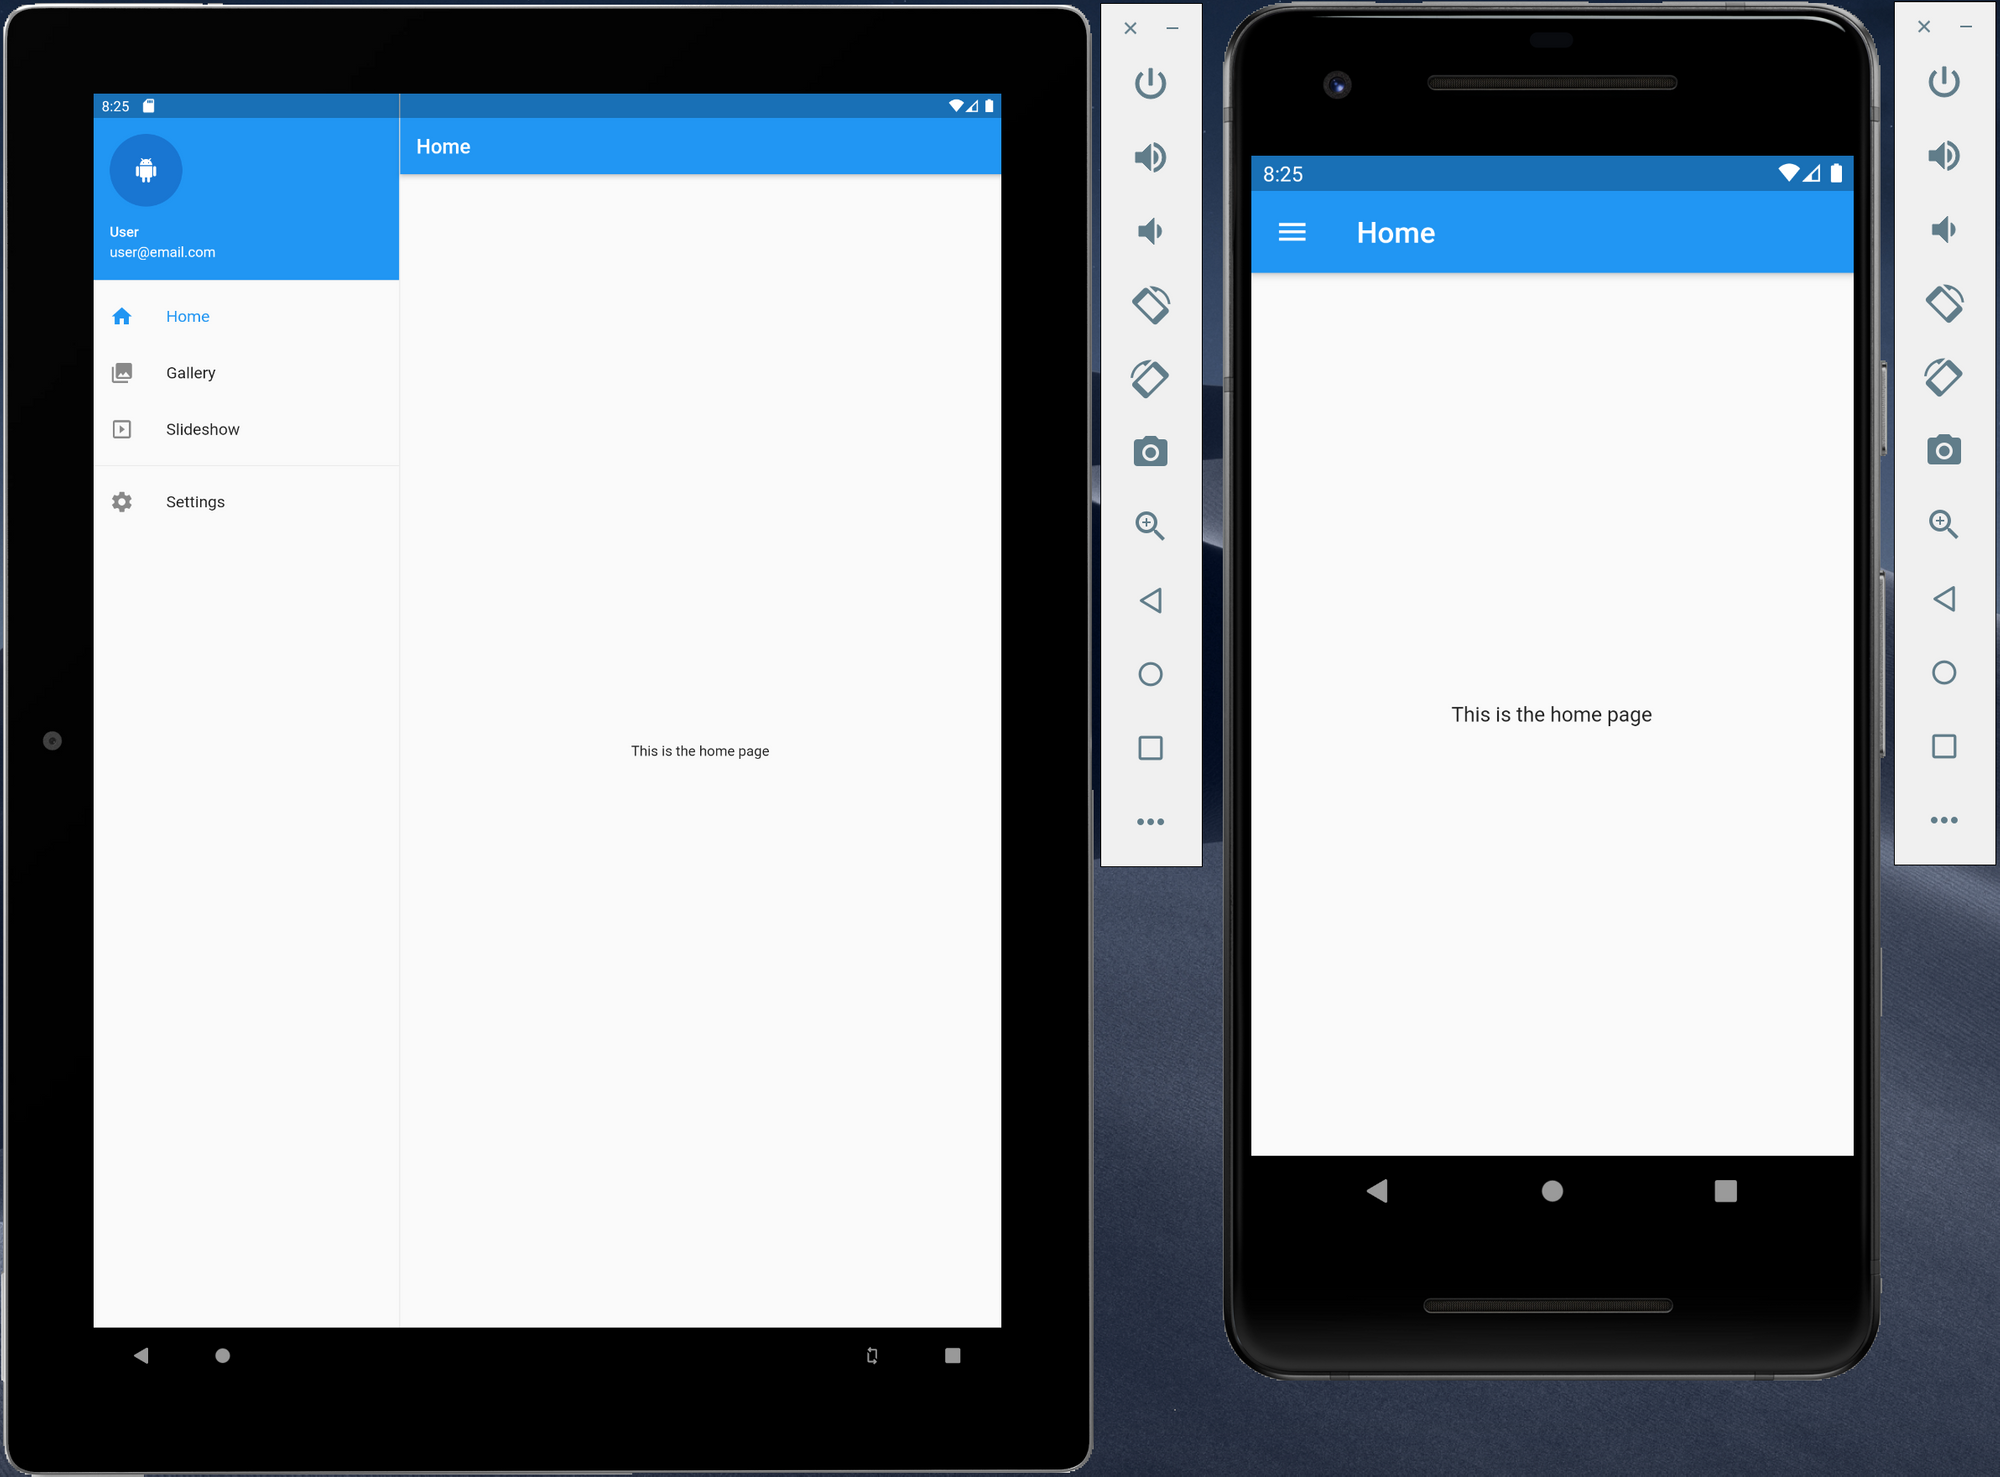
- on a device with a smaller form factor (e.g. mobile phone), the application bar should have a button (often referred to a hamburger button) that presents a modal navigation drawer (aka hamburger menu). For convenience, we'll refer to this as the mobile layout of your application
- on a device with a larger form factor (e.g. browser, tablet, desktop), the navigation drawer is permanently displayed on the screen. This is typically on the left of the screen. The right side will be a details pane that contains information related to what the user has selected in the navigation drawer. I'll refer to this as the tablet/desktop layout.
- if the application is running on a large device and can be resized, it should be able to seamlessly transition between the mobile and tablet/desktop layout as the user resizes the application window.
Let's see how this can be done. If you need to be able to run your application on the web, make sure you've turned on web support as per the guide here. Note that I did this on the dev channel where the version of the SDK was 1.10.5 at the time of writing this. Once done, create a brand new application. We'll start by editing the main.dart file
import 'package:flutter/material.dart';

import 'constants/route_names.dart';
import 'pages/gallery_page.dart';
import 'pages/home_page.dart';
import 'pages/settings_page.dart';
import 'pages/slideshow_page.dart';
import 'widgets/app_route_observer.dart';

void main() => runApp(DemoApp());

class DemoApp extends StatelessWidget {
  @override
  Widget build(BuildContext context) {
    return MaterialApp(
      title: 'Responsive app with navigation drawer',
      theme: ThemeData(
        primarySwatch: Colors.blue,
        pageTransitionsTheme: PageTransitionsTheme(
          // makes all platforms that can run Flutter apps display routes without any animation
          builders: Map<TargetPlatform,
                  _InanimatePageTransitionsBuilder>.fromIterable(
              TargetPlatform.values.toList(),
              key: (dynamic k) => k,
              value: (dynamic _) => const _InanimatePageTransitionsBuilder()),
        ),
      ),
      initialRoute: RouteNames.home,
      navigatorObservers: [AppRouteObserver()],
      routes: {
        RouteNames.home: (_) => const HomePage(),
        RouteNames.gallery: (_) => const GalleryPage(),
        RouteNames.slideshow: (_) => const SlideshowPage(),
        RouteNames.settings: (_) => const SettingsPage()
      },
    );
  }
}

/// This class is used to build page transitions that don't have any animation
class _InanimatePageTransitionsBuilder extends PageTransitionsBuilder {
  const _InanimatePageTransitionsBuilder();

  @override
  Widget buildTransitions<T>(
      PageRoute<T> route,
      BuildContext context,
      Animation<double> animation,
      Animation<double> secondaryAnimation,
      Widget child) {
    return child;
  }
}
In the main.dart file we've done the following
- specified that we're building an application using Material Design via the
MaterialAppwidget - we have customised our theme to change the default page transition animations that occur when navigation to various routes using the
PageTransitionsThemeclass. In this case, we have created a_InanimatePageTransitionsBuilderclass. It extends thePageTransitionsBuilderclass that is used by defining page transition animations. ThebuildTransitionsmethod that has been overridden is responsible for determining how to animate the widget (thechildparameter) that is upon navigating to a specified route. By returning thechild, this means no animation occurs. Thebuildersproperty of thePageTransitionsTheme, is a dictionary where we can set what page transition animation is for each platform. Here, we've mapped each target platform to the_InanimatePageTransitionsBuilderclass so that navigating will not result in a page transition animation for any platform - named routing has been configured. For more details on navigating with named routes, refer to this cookbook recipe. The
HomePage,GalleryPage,SlideshowPageandSettingsPagerepresent the pages that the app can present to the user. The code for these will be shown later. To allow the code to be more organised and facilitate code reuse, the name of the routes been defined in a constants file calledroute_names.dart
class RouteNames {
  static const String home = '/';
  static const String gallery = '/gallery';
  static const String slideshow = '/slideshow';
  static const String settings = '/settings';
}- the
navigatorObserversproperty of theMaterialAppwidget has been set so that parts of the app can be notified when navigation has occurred within the app. TheAppRouteObserverclass looks like this
import 'package:flutter/material.dart';

class AppRouteObserver extends RouteObserver<PageRoute> {
  factory AppRouteObserver() => _instance;

  AppRouteObserver._private();

  static final AppRouteObserver _instance = AppRouteObserver._private();
}
It may have been possible to simply define global variable of that is of type RouteObserver<PageRoute>. However I try to avoid having global variables as it can make the code harder to maintain amongst many other reasons. Creating the AppRouteObserver class with a factory constructor ensures that there is only a single instance that gets created. This class is used so that the navigation drawer knows which page is currently being presented so that it can be the corresponding navigation link is highlighted. Doing this requires use to create a widget that will render the navigation drawer
import 'package:flutter/material.dart';

import '../constants/page_titles.dart';
import '../constants/route_names.dart';
import 'app_route_observer.dart';

/// The navigation drawer for the app.
/// This listens to changes in the route to update which page is currently been shown
class AppDrawer extends StatefulWidget {
  const AppDrawer({@required this.permanentlyDisplay, Key key})
      : super(key: key);

  final bool permanentlyDisplay;

  @override
  _AppDrawerState createState() => _AppDrawerState();
}

class _AppDrawerState extends State<AppDrawer> with RouteAware {
  String _selectedRoute;
  AppRouteObserver _routeObserver;
  @override
  void initState() {
    super.initState();
    _routeObserver = AppRouteObserver();
  }

  @override
  void didChangeDependencies() {
    super.didChangeDependencies();
    _routeObserver.subscribe(this, ModalRoute.of(context));
  }

  @override
  void dispose() {
    _routeObserver.unsubscribe(this);
    super.dispose();
  }

  @override
  void didPush() {
    _updateSelectedRoute();
  }

  @override
  void didPop() {
    _updateSelectedRoute();
  }

  @override
  Widget build(BuildContext context) {
    return Drawer(
      child: Row(
        children: [
          Expanded(
            child: ListView(
              padding: EdgeInsets.zero,
              children: [
                const UserAccountsDrawerHeader(
                  accountName: Text('User'),
                  accountEmail: Text('user@email.com'),
                  currentAccountPicture: CircleAvatar(
                    child: Icon(Icons.android),
                  ),
                ),
                ListTile(
                  leading: const Icon(Icons.home),
                  title: const Text(PageTitles.home),
                  onTap: () async {
                    await _navigateTo(context, RouteNames.home);
                  },
                  selected: _selectedRoute == RouteNames.home,
                ),
                ListTile(
                  leading: const Icon(Icons.photo_library),
                  title: const Text(PageTitles.gallery),
                  onTap: () async {
                    await _navigateTo(context, RouteNames.gallery);
                  },
                  selected: _selectedRoute == RouteNames.gallery,
                ),
                ListTile(
                  leading: const Icon(Icons.slideshow),
                  title: const Text(PageTitles.slideshow),
                  onTap: () async {
                    await _navigateTo(context, RouteNames.slideshow);
                  },
                  selected: _selectedRoute == RouteNames.slideshow,
                ),
                const Divider(),
                ListTile(
                  leading: const Icon(Icons.settings),
                  title: const Text(PageTitles.settings),
                  onTap: () async {
                    await _navigateTo(context, RouteNames.settings);
                  },
                  selected: _selectedRoute == RouteNames.settings,
                ),
              ],
            ),
          ),
          if (widget.permanentlyDisplay)
            const VerticalDivider(
              width: 1,
            )
        ],
      ),
    );
  }

  /// Closes the drawer if applicable (which is only when it's not been displayed permanently) and navigates to the specified route
  /// In a mobile layout, the a modal drawer is used so we need to explicitly close it when the user selects a page to display
  Future<void> _navigateTo(BuildContext context, String routeName) async {
    if (widget.permanentlyDisplay) {
      Navigator.pop(context);
    }
    await Navigator.pushNamed(context, routeName);
  }

  void _updateSelectedRoute() {
    setState(() {
      _selectedRoute = ModalRoute.of(context).settings.name;
    });
  }
}
The following has been done in this class
- It's been made a
StatefulWidgetso that the when the app presents a new page, the appropriate navigation link (i.e.ListTile) is highlighted - It has a property called
permanentlyDisplay. When set to true, the navigation drawer should always be kept on-screen. This will occur in size of the application window is large enough. In other cases, the navigation drawer would be presented modally - It renders a
Drawerwidget that has been specifically created for displaying navigation drawers. It contains a list of navigation links (represented by theListView) and each one corresponds to aListTilewidget. Tapping on a navigation link will close the drawer if it's been shown modally (i.e. the mobile layout of the app has been rendered) and will take the user to the selected destination/page. - If the navigation drawer is being permanently displayed, the
VerticalDividerwidget is used to help provider a clearer separation between the navigation drawer and details pane. For readability I've made thechildof theDrawerwidget aRowto display the list of navigation links alongside the vertical divider that is conditionally displayed. An alternative to this would have been the look at the value of thepermanentlyDisplayproperty and if the value istrue, thenchildis set to be theRowwidget whose children remain the same as above. If the value isfalsethen the child is theListViewwidget that contains our navigation links. This would have reduced the number of elements rendered in the widget tree as we won't always render a row. However, in my opinion this is a minor optimisation that comes at the cost of reducing the readability of the code - The
RouteAwaremixin has been added. The widget then subscribes to an instance of theAppRouteObserverclass so it can be notified when routes have been pushed or popped. ThedidPushanddidPoprespectively have been overridden to handle these events and call the_updateSelectedRoutemethod. The latter method will cause theAppDrawerwidget to be rebuilt so that the correct navigation link is highlighted via theListTile'sselectedproperty
Now that we have our navigation drawer, let's see how we have our application automatically adjust to changes in the screen/window size. Flutter applications that use Material Design will generally use the Scaffold widget for rendering the various pages as it contains the structure for elements like the application bar and the page content itself. As we're looking to build responsive layouts, this class needs to be extended and the result is as follows
import 'package:flutter/material.dart';

import 'app_drawer.dart';

/// A responsive scaffold for our application.
/// Displays the navigation drawer alongside the [Scaffold] if the screen/window size is large enough
class AppScaffold extends StatelessWidget {
  const AppScaffold({@required this.body, @required this.pageTitle, Key key})
      : super(key: key);

  final Widget body;

  final String pageTitle;

  @override
  Widget build(BuildContext context) {
    final bool displayMobileLayout = MediaQuery.of(context).size.width < 600;
    return Row(
      children: [
        if (!displayMobileLayout)
          const AppDrawer(
            permanentlyDisplay: true,
          ),
        Expanded(
          child: Scaffold(
            appBar: AppBar(
              // when the app isn't displaying the mobile version of app, hide the menu button that is used to open the navigation drawer
              automaticallyImplyLeading: displayMobileLayout,
              title: Text(pageTitle),
            ),
            drawer: displayMobileLayout
                ? const AppDrawer(
                    permanentlyDisplay: false,
                  )
                : null,
            body: body,
          ),
        )
      ],
    );
  }
}
Here we have a "responsive" scaffold that will display the navigation drawer (the AppDrawer class we saw earlier) alongside the actual Scaffold widget that represents our details pane if the screen/window size is large enough. This was achieved by
- Using the
MediaQuery.ofmethod within thebuildmethod of our widget. It will give us the size of the screen/window. If the user resizes the application window, thebuildmethod of ourAppDrawerwidget will be called, allowing us to know what the new window size is. In this case, we check the width and decided that if it's less than 600 logical pixels then we will present the mobile layout of our application is presented to the user. The value selected was based on what's in the Android docs here, where that is the width for a 7 inch tablet. The Material Design guidelines also has documentation on breakpoints here - If we have determined that a mobile layout should be used (based on the
displayMobileLayoutvariable) we let theAppBar(application bar) deduce that it should display the hamburger button via theautomaticallyImplyLeadingproperty. This occurs as would've set theScaffold'sdrawerproperty to an instance of ourAppDrawerclass. If the application is tablet/desktop mode so to speak, then our application bar won't have the hamburger button displayed asautomaticallyImplyLeadingwould be false
With that done, we can now build our pages. For brevity, I've only included the code of the HomePage class below
import 'package:flutter/material.dart';

import '../constants/page_titles.dart';
import '../widgets/app_scaffold.dart';

class HomePage extends StatelessWidget {
  const HomePage({Key key}) : super(key: key);

  @override
  Widget build(BuildContext context) {
    return const AppScaffold(
      pageTitle: PageTitles.home,
      body: Center(
        child: Text('This is the home page'),
      ),
    );
  }
}
The HomePage class makes use of our responsive scaffold (AppScaffold) whilst passing in the title to display in the application bar and the main content of the page. This is it looks running on a Pixel 2 emulator and Pixel C emulator
Thanks to Codemagic, you can play around with it online here. If you'd like to look at the code, it's available on GitHub via this link. If you have any comments leave them below